This post is available in: Chinese`
This is the third and final post in a series looking at CoreOS.
In my last post, we looked at the cloud-config file, running etcd in proxy mode, and some common etcd cluster setups.
In this post, we take a closer look at systemd, unit files, Fleet, and fleetctl.
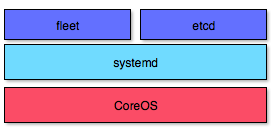
systemd is an init system used by CoreOS that provides many powerful features for starting, stopping, monitoring, and restarting process. On CoreOS, systemd is used to manage the lifecycle of your Docker containers and also for different system bootstrap tasks.
Learning systemd would need a series of blog posts in itself. Here we only cover systemd to the extent that we need to run systemd units for Docker containers on CoreOS.
For more information about systemd, see the documentation.
Unit Files
systemd records initialization instructions for each daemon in a configuration file called a unit.
This system replaces the traditional System V per-daemon init scripts.
There are many different unit file types, but we’ll only cover the services type used to run Docker containers. We call these service units.
Here’s a list of the most useful features, presented in the order they’ll occur in the lifecycle of a service unit:
-
ExecStartPre: commands that run before ExecStart
-
ExecStart: main commands to run for this unit
-
ExecStartPost: commands that run after all ExecStart commands have completed
-
ExecReload: commands that run when this unit is reloaded via systemctl reload foo.service
-
ExecStop: commands that run when this unit is considered failed or if it is stopped via systemctl stop foo.service
-
ExecStopPost: commands that run after ExecStop has completed
-
RestartSec: the amount of time to sleep before restarting a service (useful to prevent your failed service from attempting to restart itself every 100ms)
Let’s create a simple unit file called hello_world.service:
[Unit]
Description=HelloWorldApp
After=docker.service
Requires=docker.service

[Service]
TimeoutStartSec=0
ExecStartPre=-/usr/bin/docker rm busybox1
ExecStartPre=/usr/bin/docker pull busybox
ExecStart=/usr/bin/docker run --rm --name busybox1 busybox /bin/sh -c "while true; do echo Hello World; sleep 1; done"
ExecStop=/usr/bin/docker stop busybox1

[Install]
WantedBy=multi-user.target
Let’s review the unit file we just created:
- The
Description shows up in the systemd log (a unit’s log can be checked with journalctl or systemdctl).
-
After=docker.service and Requires=docker.service means this unit only starts after docker.service is active. You can define as many of these as you want. You can delimit multiple After requirements using space as a separator.
- The
=- is systemd syntax to ignore errors for this command. In our case, Docker will return a non-zero exit code if we try to stop a container that doesn’t exist, so this is not an error for us.
-
ExecStartPre=-/usr/bin/docker rm busybox1 will remove the Docker image busybox1 if such image exists. If there’s no Docker image to remove, the script will just move on.
-
ExecStartPre=/usr/bin/docker pull busybox will pull the busybox image from the Docker registry.
-
ExecStart= allows you to specify any command that you’d like to run when this unit is started. Do not run Docker containers with -d because this will prevent the container from starting as a child of this process. systemd will think the process has exited and the unit will be stopped.
-
ExecStop=/usr/bin/docker stop busybox1 will stop the Docker container busybox1.
-
WantedBy=multi-user.target” tells systemd to pull in the unit when starting multi-user.target.
Now to start a new unit, we need to tell systemd to create the symlink and then start the file:
$ sudo systemctl enable /etc/systemd/system/hello.service
$ sudo systemctl start hello.service
To verify the unit started, check the list of containers running with:
Then, read the unit’s output with journalctl, like so:
$ journalctl -f -u hello.service
-- Logs begin at Fri 2014-02-07 00:05:55 UTC. --
Feb 11 17:46:26 localhost docker[23470]: Hello World
Feb 11 17:46:27 localhost docker[23470]: Hello World
Feb 11 17:46:28 localhost docker[23470]: Hello World
[...]
Here, -u means unit, and -f means follow. Press CTRL-c to exit.
The systemd service units can only run and be controlled on a single machine. They are best used for simple tasks, like downloading files on reboot, and so on.
For more information about systemd units, see the documentation.
Fleet runs on top of systemd and controls systemd at the cluster level, creating a distributed systemd:
To run your services in the cluster, you must submit regular systemd units combined with fleet-specific properties.
fleetctl
fleetctl is a command line tool allowing you to control fleet units on local and remote CoreOS Clusters.
The fleetctl commands are very similar to systemctl commands, and we do not have to use sudo with fleetctl.
fleetctl commands can be run directly on a cluster machine.
Or, if you prefer to execute fleetctl from an external host (i.e. your workstation), a system environment variable can be used to tunnel communication with your fleet cluster over SSH, like so:
$ export FLEETCTL_TUNNEL=remote_machines_ip
Let’s look at some of the tasks you can perform, listed with the required commands.
Loading and starting the unit:
$ fleetctl start hello_world.service
Checking the status of the unit:
$ fleetctl status hello_world.service
Stopping the service:
$ fleetctl stop hello_world.service
Viewing the content of service file:
$ fleetctl cat hello_world.service
If you want to upload the unit file without starting it:
$ fleetctl submit hello_world.service
Check the hello_world.service logs:
$ fleetctl journal hello_world.service
You can even ssh to the host that runs the unit:
$ fleetctl ssh hello_world.service
Listing all running fleet units:
Listing fleet cluster machines:
Unit Files
Unit files are the primary interaction with fleet.
As with systemd units, fleet units define what you want to do and how fleet should provision them. Fleet schedules a valid unit file to one or more machines in a cluster, taking in mind fleet’s special properties from the [X-Fleet] section, which replace the systemd unit’s [Install] section.
The rest of systemd’s sections remain the same in fleet units.
Let’s review fleet specific options:
-
MachineID: Unit will be scheduled to the machine identified by a given string
-
MachineOf: Limit eligible machines to the one that hosts a specific unit
-
MachineMetadata: Limit eligible machines to those with this specific metadata
-
Conflicts: Prevent a unit from being collocated with other units using glob-matching on the other unit names
-
Global: Schedule this unit on all machines in the cluster
All of these go in the [X-Fleet] section of the unit file.
A unit is considered invalid if options other than MachineMetadata are provided alongside Global=true. Global units are very useful if you want to schedule the same unit on all machines or on some machines which MachineMetadata matches some value.
Let’s convert the systemd unit file hello_world.service we used above to a fleet unit:
[Unit]
Description=HelloWorldApp
After=docker.service
Requires=docker.service

[Service]
TimeoutStartSec=0
ExecStartPre=-/usr/bin/docker rm busybox1
ExecStartPre=/usr/bin/docker pull busybox
ExecStart=/usr/bin/docker run --rm  --name busybox1 busybox /bin/sh -c "while true; do echo Hello World; sleep 1; done"
ExecStop=/usr/bin/docker stop busybox1

[X-Fleet]
MachineMetadata=group=hw_webservers
Conflicts=hello_world@*
What does hello_world@* do in this example?
Well, let’s say we have two identical hello_world@1.service and hello_world@2.service files.
We can start them on the cluster like so:
$ fleetctl start hello_world@*
These two fleet units will be deployed to servers with MachineMetadata=group=hw_webservers metadada set, and Conflicts=hello_world@* will prevent a unit from being collocated with other units using glob-matching on the other unit names.
Let’s look at a few more examples with other fleet options for hello_world.service unit.
This schedules this unit on all machines in the cluster:
This schedules the unit on the machine that has the some_other_unit.service unit.
[X-Fleet]
MachineOf=some_other_unit.service
This schedules the unit to the machine with the ID 562999f8:
[X-Fleet]
MachineID="562999f8"
You can check machine ID with:
For more information about fleet units, see the documentation.
Run a Container in the Cluster
Running a single container is very easy.
All you need to do is provide a regular unit file without an [Install] section, like so:
[Unit]
Description=hello_docker
After=docker.service
Requires=docker.service

[Service]
TimeoutStartSec=0
ExecStartPre=-/usr/bin/docker rm busybox1
ExecStartPre=/usr/bin/docker pull busybox
ExecStart=/usr/bin/docker run --rm --name busybox1 busybox /bin/sh -c "while true; do echo Hello Docker; sleep 1; done"
ExecStop=/usr/bin/docker stop busybox1
Note: If you’ve been running Docker commands manually, make sure you don’t copy a Docker run command that starts a container in detached mode (indicated by the -d switch). This will cause the unit to run for just a few seconds and then exit.
Wrap-Up
In this post, we looked at:
- Writing unit files for systemd
- How Fleet is used to create a distributed systemd
- Writing unit files for Fleet
Don’t miss the previous two parts of this miniseries. In part one, we looked the basics of CoreOS, atomic upgrades and release channels, and cluster discovery. And in part two, we looked at cloud-config and etcd.
In my next miniseries, I’ll be looking at Docker.